


How to Keep Old Melters Operable
Do you have an old series 2300 or 3000 melter that you are still using but need to find parts for? If you do, your packaging line is running a melter that is 15 – 20 years old. That means that your line operators are maintaining your packaging lines well and spending money in the right areas to keep efficiency and durability a priority. With that said, not everything will last forever. While you can probably keep the control panels of the 2300 or 3000 melter, some of the internal and exterior parts may need to be replaced. The reality is that Nordson® no longer supports these tanks. However, Universal Systems SE does. Universal Systems SE manufactures pumps, filters, hoses, guns, modules and nozzles that are compatible with your old melters.
Pneumatic Pumps
The first thing to go on your old melter, will most likely be your pump. Once that stops working, it will become very clear that your OEM no longer manufactures replacements for that part. So now you have to decide between purchasing a new melter from them for $15,000+, or trying to replace your pump. Universal Systems SE manufactures new series 2300 and 3000 pumps for a fraction of the price of a new Nordson® melter. Check out our full line of pneumatic pumps.
Actuator
If you have experience with rebuilding pumps, Universal Systems also manufactures the pump shifter and fork for the ProBilt™ series 2300 and 3000 pumps. This is another item you will not be able to find with the OEM because it has been discontinued.
Tank Filters
Since your series 2300 or 3000 melters have been operating on the line for so many years, your line operators probably change out the tank filters frequently. As the years have gone by, you may find it more difficult to find reasonably priced, or readily available tank filters. Universal Systems manufactures the tank filter assemblies, filter cores and filter screens to fit your series 2300 and 3000 melters.
Same Footprint
If you have gone through all of the steps to fix the problem with your old melter and find out that it is the control panel, which has been discontinued, Universal Systems SE has a solution for that as well. Our ProBilt™ melters have the same footprint and dimensions as your current series 2300 or 3000 melter. That means that your NEW ProBilt™ melter, that comes with a 10-year heater warranty, will fit right in where your old melter comes out.
For more information or to contact a technician that can help you troubleshoot issues with your old melter, call (561) 272-5442 or email sales@ussefl.com.
Managing Your Glue Usage in Packaging
Hot melt adhesive is not cheap and you may notice that the prices are only going up. What purchasing agents might not know, is that a lot of packaging lines are using more glue than is actually needed. There are a few simple ways to manage your actual glue usage and help cut costs to manage your budget.
Nozzle Diameter
The first step in managing your glue usage, is knowing the diameter nozzle tip you are using in your packaging lines, and understanding why you are purchasing that size. A lot of times, our sales reps will get calls from customers that want to buy larger size nozzle tips because their line operators are saying there is not enough glue being released on the cartons. Obviously, as you increase your nozzle tip diameter, the more glue you are going to use overall and increase your yearly costs for adhesive. This can also cause several other issues, such as potential sealing issues if the hot adhesive does not have enough time to dry as it moves along the cartoner. If your line operators are asking for larger diameter nozzles, question them as to why.
Evaluate Set-up
If your line operators are stating that the glue is not keeping the packaging closed, which is why they need larger nozzles, evaluate your setup. Check the distance your gun applicator is to your carton and at what temperature you are heating your adhesive. If the adhesive is not hot enough and your gun is too far away from the application site, the adhesive could be cooling before it even hits the carton which is why it is not creating a tight seal. Simply increasing your heating temperature or moving your gun applicator closer to the end application site could solve this issue. You could also be putting down too much glue already. If you have a high-speed packaging line, and put down too much glue, the speed will not allow time for the large amount of glue to dry.
Change Your Filters
Another simple solution to managing your glue usage, is to check both your tank and gun filters. If your nozzles are clogging frequently, causing the line operators to buy larger diameter nozzles, they may be clogging due to char. Char is a typical occurrence in hot melt packaging, but the transfer of most char can be prevented by regularly changing your tank and gun filters. These filters will extend the life of both your modules and nozzles.
For more information or tips on how to increase your packaging line efficiency and lower your costs, call a Universal Systems representative at (561) 272-5442 or email us at sales@ussefl.com.
Line Operators: The First Line of Defense
Understanding hot melt tank systems is no simple task. It usually takes years of experience to learn how to effectively manage adhesive systems and keep your packaging line running efficiently and effectively. Universal Systems SE understands that new line operators come into work and might need help learning which items to replace and how to replace them the correct way. That is why we offer technical support to all of our ProBilt™ customers!
There are several maintenance tasks that we recommend be completed on a regular basis to keep your adhesive system free of char and debris, which is the number one culprit in bringing down a line. Below is an easy maintenance checklist that each line operator should have in hand.
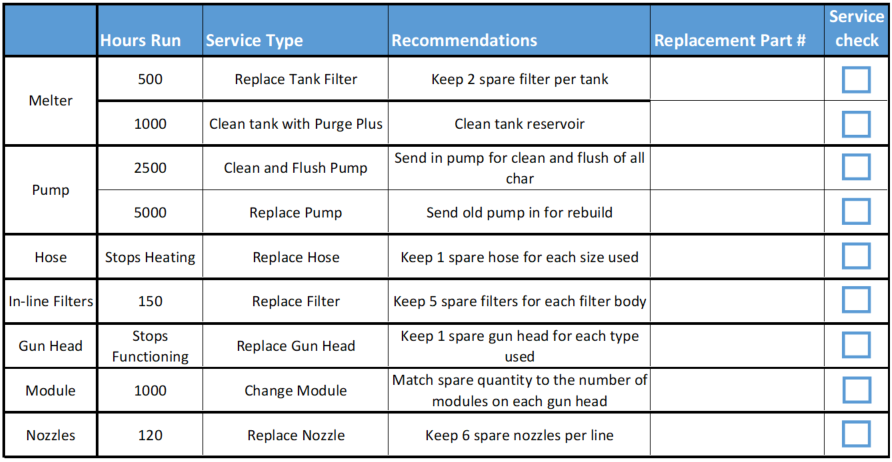
We recommend that you print this checklist out and give it to every shift that operates the packaging line. Keep in mind that changing out items such as gun heads, modules, filters and pumps all require you to clear the old lines and remove the air pressure before re-installation. Releasing the air pressure and removing all old adhesive will ensure that all seals stay intact and reduces the char transferred from the old to the new parts.
If you need help changing out parts or have questions about which items need to be changed regularly, please call (561) 272-5442 or email sales@ussefl.com.
Troubleshooting Tips for Packaging Line Issues
Since Universal Systems SE offers technical support for all of our customers, we get several calls per day with all different kinds of technical issues that line operators experience. Because many packaging lines run 24/7, without regular maintenance of key products there will always be issues after a certain period of time. As always, we recommend changing your filters, nozzles and modules when needed to eliminate any potential issues. However, there may be other parts on your packaging lines causing these issues.
For example, if you are experiencing a dripping or not fully functional module, it is most likely not an issue with the module itself. Especially since all products go through a vigorous quality control process before leaving our facility. Because the modules are air open and spring close, there are a few items to check before switching out the module. First, Universal Systems SE recommends that you check the solenoid valve. The solenoid valve is the air supply that runs into the applicator gun and fires the glue onto the box. If the solenoid valve fails, it will not generate air power to fully open the module. If the solenoid valve is weak, it will not fully exhaust all of the air out of the module, and the module piston will not seat properly, causing a drip. Another potential issue could be that char or debris has been transferred from the tank into the gun and has gotten stuck in the spring close. This piece of char, no matter how small it could be, can limit the spring from fully closing causing “dripping”. Spring tension on the gun module being set too low could also cause “dripping”, so make sure you try to adjust that before switching out modules. Finally, if the line operator has not gone through the correct steps to change out the module, the module could be compromised. The line operator needs to make sure that they lower the air pressure used on the tank before switching modules. If they do not, they could potentially send glue into the air chamber of the gun when removing the old module.
Another common technical issue is that the heated hoses are either not heating or not heating to the correct temperature. The first step is to check and ensure that the hose zone is not set to “off”. If it is, turn the hose zone to “on”. Then, you should check to make sure all connectors are securely tightened and the controller settings are correct. If all of those are working, you next need to check the ohms reading on the hose heater and hose RTD, and all of the board fuses. A USSE technical support representative can walk you through this check process and help identify the real issue.
For more information or if you need technical support not mentioned, please call (561) 272-5442 or email sales@ussefl.com
Piston Pump Troubleshooting
There are several things that can cause a piston pump to stop working. The most common reason is that it is clogged. Unfortunately, not all line operators take the time to close the lid on a glue tank. With a lot of carton dust in the air at any facility, this dust gets into the glue pot and melts in with the glue. When the pump shifter runs to pump the glue from the pot into the hose, that carton dust gathers around the pump which can cause it to seize. The simple solution to this is to make sure that all shift line operators are diligent about closing the tank covers, that’s why they are on there.
If carton dust is not your issue, and the pump fails, below are a few other possible causes and the corresponding solutions.
- Adhesive not sufficiently heated – check the tank temperature and required melt temperature of your adhesive and set accordingly.
- Inadequate or no input air to pump – increase the air pressure from the plant air supply and see if the pump will run.
- Dry running – when a tank drops below a certain adhesive level in the pot, the pump does not have enough glue to operate at full capacity. The glue that runs through the pump acts as a padding so that the shifter does not pound against the top and bottom of the pump itself. When that padding is less, the pounding shifter can cause damage to the magnets and create an issue with the shifter. The only solution to this is to get a new shifter and potentially invest in an auto fill on-demand system that fills the glue into the tank for you, leaving less pressure on the line operators to fill the pot.
- No Tank Screen or Clogged Tank Screen – the tank screen lives at the bottom of the tank and is the first line of defense against any foreign debris getting into the pump. Sometimes the tank screen gets removed or never cleaned. That can cause debris build up and seize your pump. It is easily cleaned by lifting out of the empty tank and then cleaning the tank with Purge Plus™.
- Clogged Tank Filter – the tank filter screws into the side of the tank and filters the glue after it leaves the tank. If the tank filter is clogged, then the adhesive will back up in the pump, causing the pump to seize.
- Pump solenoid is not on – if the tank is not within 35 degrees of the setpoint temperature on the control panel, the pump solenoid will not turn on. Check the setpoint temperature and make sure it is correct. If the setpoint temperature is correct and reading properly, then it might be a failed solenoid that needs to be replaced.
If you go through all of these troubleshooting steps and still have an issue with your pump, please call (561) 272-5442 or email sales@ussefl.com.
Why Should You Clean Your Melter Filter
First and foremost, your melter adhesive filter should be flushed once a day. Cleaning your melter filter can be dangerous so always remember to wear safety glasses and heavy duty gloves. This will help to prevent any injuries that might be caused by splashing hot melt adhesive during the flushing process.
The first thing you must do is heat your system to its operating temperature. This is very important to prevent damage to the filter screen. Next, you will need to reduce your pump air pressure to zero at the air regulator. Then, you must relieve the system pressure by triggering any and all guns. This will now relieve trapped hydraulic pressure. After all system pressure is released, you can open the manifold drain valve. Using a screwdriver, open the valve over an open container. You then want to slightly increase pump pressure until a steady flow of adhesive comes from the drain. Continue to allow material to flow until it appears clean and free from any foreign matter. Once the adhesive appears to be clear, shut off the air pressure to the pump and close the manifold drain valve. You now have successfully cleaned your melter filter.
The importance of a clean filter when operating your melter system is imperative to running a high-quality machine. Many people wonder if they should clean their filters or if they should buy new. The easiest way to tell if your filter should be replaced is if you have used it for longer than 200 hours. Every high-quality filter, even when cleaned daily, will only last up to 200 hours of operating time.
If you do need to replace your filter please follow the below steps.
- Heat the system to operating temperature.
- Reduce your pump air pressure to zero and trigger all guns to relieve trapped hydraulic pressure.
- Loosen the filter with a socket type wrench.
- Wearing Kevlar gloves, carefully pull the filter assembly out of the manifold.
- Remove the screw in the back of the filter assembly and discard the filter screen.
- Replace the filter screen and reinstall screw.
- Inspect o-rings for damage and replace if necessary.
- Slide the filter assembly back into the manifold and tighten until it seats.
Make sure that you purge the manifold by opening the drain valve and increasing the pump air pressure slightly until a steady flow of hot melt is released from the drain. Close the drain valve and your machine is ready to operate with your new filter.
To order replacement tank filters please reach out to Universal Systems SE at sales@ussefl.com or call us at (561) 272-5442.
Hot Melt Adhesive Equipment: Troubleshooting Tips
Whether you’ve already invested in hot melt glue equipment, or you’re considering it, knowing how to troubleshoot any potential problems is highly advised by any hot melt adhesive machinery as well as equipment distributors and manufacturers. However, before we get into common troubleshoots; let’s define what hot melt adhesive systems actually do.
What is a Hot Melt Adhesive System?
Hot melt adhesive systems are composed of different pieces of equipment that come in a variety of pump, hopper, and hose gun connection sizes in order to satisfy your individual production needs. Hot melt glue machinery can be used to assist several different industries including, but not limited to:
- Bookbinding
- Breweries
- Graphic Arts
- Labeling / Laminating
- Packaging
Troubleshooting Mechanical Problems With Your Hot Melt System
Now, we don’t advise that you should try and troubleshoot a hot melt dispensing unit on your own unless you’re a qualified professional. If you are a qualified professional, observe and follow the safety instructions within your OEM manual that you were given for your specific machine.
-
IF YOUR PISTON PUMP ISN’T WORKING PROPERLY
First, check to see if the unit has reached its operating temperature, if it has, then there could be a problem with your air supply, the solenoid valve, or there’s something wrong with the assembly of the shifter valve.
-
IF THE PISTON PUMP IS STROKING ERRATICALLY
If this problem is occurring, then you may be low on adhesive, if you’re adhesive level is fine, then check to make sure that the adhesive is actually melted. You’ll also want to check the pump seats in case anything became lodged within them, as well as make sure that the o-ring in the crossover tube isn’t broken.
-
IF THE GEAR PUMP IS NOT PUMPING PROPERLY
One of the first things to check if your gear pump is not pumping properly is the motor. If the motor is not running, you want to check the motor control as well as the capacitor. If you don’t see anything wrong with the motor than look for any fault indicators, as well as making sure that the pump ready light is on. In the event that none of these tips help, then there may be a blown fuse.
-
IF NO ADHESIVE IS PUMPING OUT
If your motor is running, but there’s no adhesive being pumped out, then you’ll need to check your adhesive levels and make sure it’s melted. There’s a chance that the nozzle could be clogged on the head however, if it’s not then you’ll need to check the inline head filters, the tank filters, the coupler between the motor and the pumped, and the pressure regulator.
Hot Melt Adhesive System: Electrical Troubleshooting Tips
Hot melt adhesive systems are a great investment if you’re looking to increase your production rate, and if you have the right equipment that works properly, then that’s even better. However, in the event that something goes wrong with your hot melt glue equipment or your adhesive machinery, you’re going to want to know how to troubleshoot the problem yourself. While your OEM manual that came with the machine should be able to help you solve the problems, you may not necessarily know what to look for, and that’s where we come in.
In the event that your hot melt adhesive dispensing unit malfunctions in any way, it’s highly advised that you seek someone who’s qualified and familiar with this machinery – if you’re not already. Now, with that being said, you want to make sure you follow all the safety instructions within the manual as well.
-
IF THE TANK IS UNDER / NOT HEATING
In the event that your tank is under heating or if it’s not heating at all, there are a few things that you could look into – the first being the system fault light and making sure there isn’t a blown fuse. After that, you’ll want to look into the resistance on the tank heater and the tank RTD, there’s also a chance that you have a burned off or broken wire leading into the tank heater.
-
IF THE HOSE IS UNDER / NOT HEATING
If your hose is either under heating or not heating at all, check the system fault light as well as a blown fuse. Checking the issues surrounding the hose is similar to checking if the tank is under heating. So, you’ll want to check the resistance on the hose heater and the hose RTD. Also, make sure that none of the electrical collectors are unplugged.
-
IF THE HEAD OF THE HOSE IS UNDER HEATING
A majority of the issues surrounding electrical deal with a blown fuse or the system fault light, therefore you’ll want to check that if the head of the hose is under heating or not heating up what so ever. You’re also going to want to check for unplugged electrical connectors, wire connectors (look for backed out pins), and the control boards.
-
IF THE TANK IS OVERHEATING
If your tank if overheating, there’s a good chance one of the four following things is wrong: – The system fault light, the resistance on the tank’s RTD, the control board, or the triac. If you’ve found that one of those four things is the issue, you should be able to find a solution in your OEM manual to get your hot melt adhesive unit is back up and running.
-
IF THE HOSE OR HOSE HEAD IS OVERHEATING
For both the hose and hose head, you’re going to want to first check the system fault light as well as the resistance on the hose RTD and the head RTD. Another thing that could have a problem is the control board.